Last updated on July 31st, 2024 at 12:56 am
You can replace a shower tap when upgrading your bathroom for a new look or putting in place worn-out fixtures. Although it may seem to be an uphill task at first, this with the correct guidelines and tools, you can attain professional results without calling on a plumber.
We are here to take you through replacing your shower tap as well as expert’s tips and step-by-step instructions that will make it easy for you. It ensures that the process is smooth and the finish flawless. For more detailed instructions and support on this journey, check out https://www.plumbersingapore.org/shower-tap-installation-replacement/
Here are some few tips in order to change your shower tap with ease:
Acquire Necessary Tools & Materials
Before diving into the task of replacing your shower tap, take a moment to gather all necessary tools and materials. This step not only saves time but also reduces frustration during the process. You can also get help from https://www.plumbersingapore.org/ .
But before starting make sure that you have all tools and materials ready. Usually, these include;
- Wrench
- Screwdriver
- Pliers
- Plumber’s tape
- Towel for any spills
- New shower tap
Turn Off the Water Supply
Shut off water supply to the showers so as to avoid any messes involving water. This is usually done by turning off the main valve or that of the individual showers.
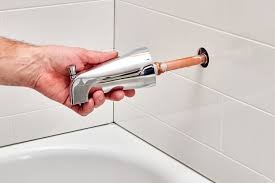
Take Out the Old Tap
Unscrewing it carefully against the wall removes an old tap. While doing this ensure that there is no damage to surrounding fixtures or tiles. Use a wrench if necessary when removing stubborn parts.
Clean Up the Area
After removing the old tap, thorough cleaning should be done on the area. In order for new taps to be installed smoothly without much difficulty, one must clean away the entire old plumber’s tape and dirt.
Apply Plumber’s Tape
To make sure that no leaks occur, you can put a plumbers tape around the threads of the new tap. This is very important as it ensures that there is a secure fit during installation.
Put In the New Tap
You should screw in gently so that it gets lined up well when placing the new tap. You have to tighten firmly but be careful not to overdo it which may cause damage.
Test for Leaks
Turn on water supply and check if there are any leaks in the new tap. If this happens, you will need to tighten your connections accordingly. It must work fine before complete finish.
Finishing Touches
After ensuring that it does not leak anymore, clean and polish the new tap for final touch. All parts should be firm and functioning well.
Common Mistakes to Avoid When Replacing Your Shower Tap
Some mistakes which you should avoid when changing shower taps:
Failing To Measure:
Forgetting to measure is one of those little known things people overlook as they change their current shower taps with new ones. Not all taps fit universally; even a slight difference can lead to leakages or poor fitting hence more problems in future.
Ignoring Water Pressure:
Most homeowners don’t usually bother about checking their water pressure before buying another tap from a supplier. A high pressure system might require certain design specifications capable of withstanding this force while low pressure would favor some other style for great efficiency.
Lose quality checks:
Cheaper alternatives sound inviting but they often come at the expense of durability and efficiency. Slightly higher initial expenses can save you from repeating repairs or having frequent replacements due to poor quality materials that deteriorate quickly. While replacing your shower tap, beware of these common stumbling blocks that will not only ensure functionality but also make your bathroom experience more comforting!
Final Thoughts
Changing a shower tap should not feel like an impossible task. Through adhering to expert advice and adopting a step-by-step process, this project can be completed successfully, confidently and precisely. Remember correct tools collection, water supply shut down as well as following all steps involved starting from removing old taps to checking new ones for leaks.